One of the first things drivers are taught about cornering on a race circuit is the outside–inside–outside line.
At the end of the straight, you enter the corner from the outside, pass close to the inside at the clipping point, and then let the car move back toward the outside on corner exit.
The usual explanation is that this allows you to use more of the track width, reduce the curvature of the driving line, increase the effective turning radius, and therefore carry more speed through the same corner.
If two drivers use similarly rational braking, steering, and acceleration inputs, that comparison is probably correct.
However, I do not think that a beginner who simply memorizes the shape of the outside–inside–outside line will necessarily understand its true value or be able to use it properly.
A driver may enter too fast and then add more steering in an attempt to reach the clipping point. When the car runs wide on exit, the driver may add even more steering in an attempt to bring it back toward the inside.
That only pushes the front tires closer to their limit and increases understeer.
Driving an outside–inside–outside line and driving quickly through a corner are not the same thing.
Even on exactly the same driving line, section time can vary greatly depending on how the driver brakes, steers, and accelerates.
Recently, I, Rikutsu Konetaro, have come to think of the outside–inside–outside line not so much as a shape that beginners should aim for from the start, but as a line whose value becomes apparent when a driver uses sufficiently refined control inputs to reduce corner-section time—and which is therefore often selected as a result.
Contents
The Corner Assumed in This Article
To simplify the explanation, this article assumes a hypothetical section of racetrack consisting of a long entry straight and a long exit straight connected by a medium- to low-speed 180-degree corner.
The curvature of the road centerline is assumed to remain constant, meaning that the corner has a constant radius.
This is therefore a corner where not only entry braking but also exit speed matters.
Real racetracks include changing curvature, elevation changes, banking, linked corners, and many other complications. In this article, however, I will temporarily ignore those factors and focus on the basic relationship between brake pedal force, steering angle, and throttle opening.
In Figure 1 below, and later in Figure 3, the target point placed on the inner boundary of the corner is called the clipping point, abbreviated as CP.
The point on the actual driving line that passes closest to the CP is shown as the inside point.
Figure 1. Schematic of an Outside–Inside–Outside Line Through a 180-Degree Corner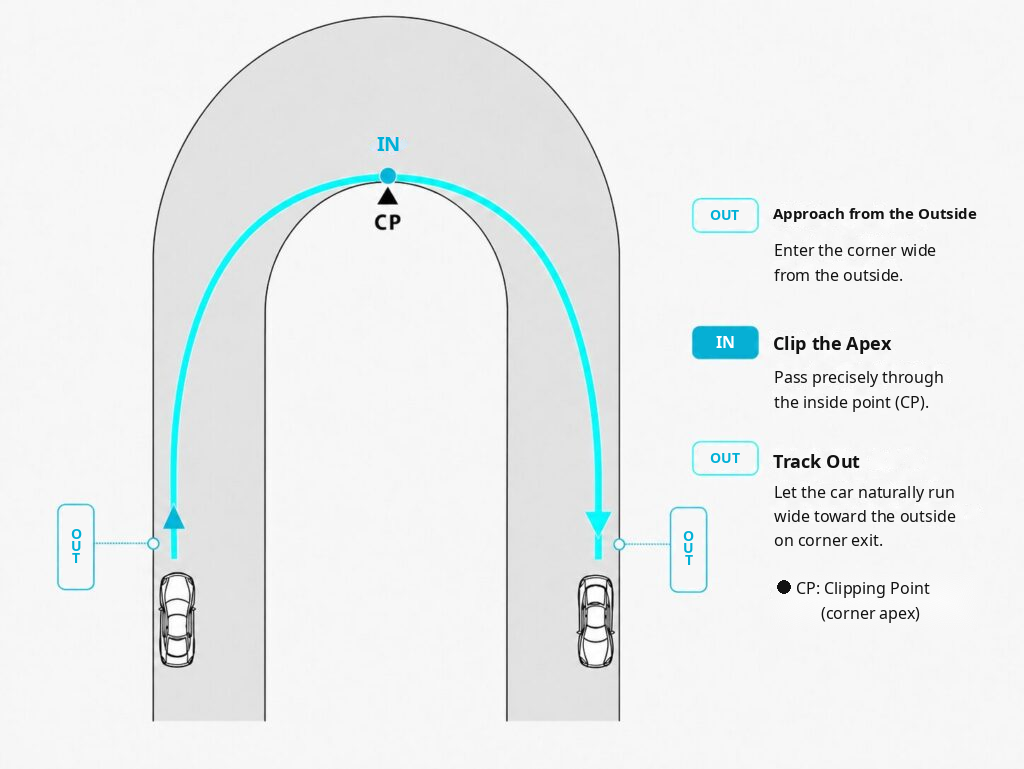
The Sequence of Inputs Required to Drive Quickly
In actual cornering, the driver performs a sequence of operations roughly like this:
At the end of the straight, keep the steering nearly neutral and apply strong, short braking to shed speed rapidly.
At turn-in, reduce brake pedal force while increasing steering angle.
Near the clipping point, finish braking and move the right foot from the brake pedal to the accelerator.
From there, progressively increase throttle opening while unwinding the steering.
To minimize the time required to pass through the entire corner section, including the straights before and after it, the driver must find appropriate answers to several questions:
How long should the high speed from the straight be maintained?
How quickly and over how short a distance should the car be slowed at the end of the straight?
How should brake pedal force be released as steering angle increases?
After the clipping point, how should steering angle be reduced while throttle opening increases?
Cornering is not merely the period during which the steering wheel is turned.
The whole sequence—from beginning to slow at the end of the straight, through the turning phase, and into acceleration toward the exit—forms one continuous cornering operation.
At the End of the Straight: Zero Steering, Hard Braking, Short Duration
On a long straight, the throttle is basically wide open and the steering is nearly neutral.
The corner gets closer and closer.
When you reach the end of the straight, quickly move your right foot from the accelerator to the brake and build strong brake pedal force over a short period while keeping the steering nearly neutral.
Depending on the corner, braking may approach the maximum level that can be used reliably with that particular car, tire, and road surface.
By “maximum,” I mean near the upper limit of braking force that can be used stably under those conditions.
At this stage, the idea is to use almost all of the tire’s available friction for deceleration.
If you apply a large steering angle while braking heavily, you are asking the tires to generate strong deceleration and strong cornering force at the same time.
That makes it much easier to exceed their available grip.
Therefore, during the main deceleration phase at the end of the straight, the steering should remain as close to neutral as practical so that most of the tire’s capability can be used for braking before corner entry.
Increase Steering Angle as You Release the Brake
Once the main braking phase is nearly complete and the car has slowed to a speed at which it can begin to turn, it is time to initiate turn-in.
Until this point, a large proportion of the tire’s available friction has been used for braking.
To turn the car, some of that capacity must now be allocated to lateral force.
That means reducing the brake pedal force that was previously near its maximum, thereby creating additional capacity that can be used for cornering.
Once that margin becomes available, steering angle can be added and the car can begin to turn.
The greater the brake pedal force, the smaller the steering angle that can be used without overloading the tire.
Conversely:
The more brake pedal force you release, the more steering angle you can use.
So as turn-in begins, brake pedal force is progressively reduced while steering angle is progressively increased.
A simple way to imagine this is:
Take one unit out of the brake, and add one unit of steering.
Of course, the actual relationship is not always one-to-one.
I use that ratio here simply because it makes the relationship easy to visualize.
The sequence begins with heavy braking at the end of the straight. Then brake force is progressively reduced while some load remains on the front tires, and steering angle is increased as the car transitions into the corner.
This sequence is trail braking.
For a more detailed discussion of load and weight transfer, see my separate article on rear-tire grip and longitudinal weight transfer during cornering.
Trail braking is not simply a technique for continuing to press the brake pedal until a later point in the corner.
It is a technique for gradually reducing brake pedal force while increasing steering angle, smoothly transferring the tire’s work from deceleration to cornering.
In that sense, trail braking serves a different purpose from the heavy braking used to shed speed at the end of the straight.
The near-maximum braking used for rapid deceleration at the end of the straight and the trail braking used during the first half of the corner should be consciously distinguished from each other.
Transition to the Throttle Near the Clipping Point
As steering angle increases while trail braking continues, the car approaches the inside near the clipping point.
In the simplified 180-degree corner assumed in this article, and in the conceptual model shown in Figure 2, trail braking ends near the clipping point.
At around this point, brake pedal force approaches zero and steering angle reaches its largest value in the sequence.
The driver then quickly moves the right foot from the brake pedal to the accelerator and begins accelerating with a small throttle opening.
If you suddenly apply a large amount of throttle while still holding a large steering angle, the tires cannot fully support both cornering and acceleration at the same time.
The result may be increased understeer or a disturbance in vehicle balance.
Therefore, the initial acceleration around the clipping point should be very gentle and appropriate to the remaining steering angle.
Of course, the point where trail braking ends does not coincide with the clipping point in every corner.
Here I am using a typical simplified example so that the relationship between brake pedal force, steering angle, and throttle opening is easier to understand.
Increase Throttle as You Unwind the Steering
After passing the inside point near the clipping point, gradually return the steering toward neutral while increasing throttle opening.
The exit side involves a trade-off similar to the one on entry.
It can be expressed like this:
The greater the throttle opening, the smaller the steering angle that can be maintained comfortably.
Conversely:
The more steering angle you unwind, the more throttle you can use.
Near the clipping point, a large portion of the tire’s available friction is being used for cornering.
If throttle opening is increased too aggressively in that state, the tires are being asked to provide both cornering and acceleration at the same time.
In addition, acceleration shifts load rearward, reducing the ability of the front tires to hold the intended line and making understeer more likely.
Depending on the vehicle, excessive throttle input can also disturb the car’s balance more significantly.
A simple way to think about the process is:
Unwind one unit of steering, and add one unit of throttle.
Unwinding the steering and increasing throttle are not two separate operations.
They should progress almost in sync while the driver searches for the maximum amount of acceleration that can be used without allowing the car to run wider than the intended line.
Figure 2. Conceptual Relationship Between Throttle Opening, Brake Pedal Force, and Steering Angle From the End of the Straight to Corner Exit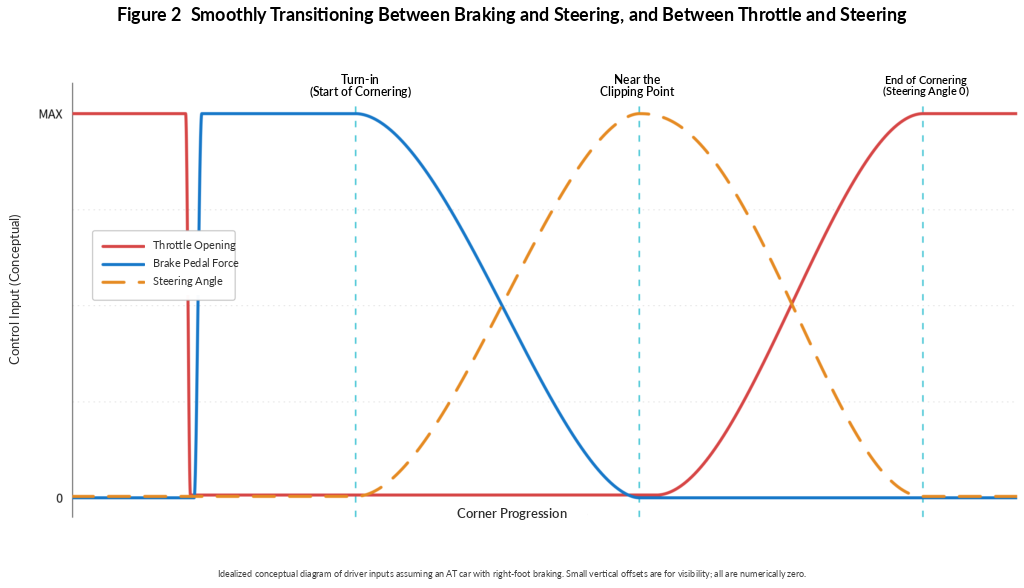
Figure 2 expresses the sequence described above as a progression through time from left to right.
The solid red line represents throttle opening.
The solid blue line represents brake pedal force.
The dashed orange line represents steering angle.
Figure 2 is not measured data.
It is an original conceptual diagram that combines my own driving experience with instruction I have received from professional racing drivers.
Its purpose is only to make the sequence and overlap of the control inputs easier to understand. It should not be assumed to apply exactly to every car or every corner.
The vertical axis represents the relative magnitude of each input.
Throttle opening, brake pedal force, and steering angle are different physical quantities, so the height of the lines and the points where they cross do not indicate physical equality.
Figure 2 also assumes an automatic-transmission car operated with the right foot only.
In a manual-transmission car, or when left-foot braking is used, the overlap between pedal inputs may differ.
Why the Result Becomes Outside–Inside–Outside
Suppose you tried to turn through the same 180-degree corner using an inside–inside–inside line instead.
To avoid exceeding the tires’ cornering limit, you would have to reduce speed more.
That would increase the amount of deceleration required at the end of the straight, lower the speed through the middle of the corner, and also reduce the speed at which acceleration could begin on exit.
At the opposite extreme, an outside–outside–outside line makes it easier to maintain a larger turning radius, but the distance traveled becomes unnecessarily long because the inside of the track is not used.
The outside–inside–outside sequence provides a better compromise.
Use the outside on entry to secure a larger turning radius and perform the main deceleration while the car is still traveling straight.
After turn-in, progressively reduce brake pedal force while increasing steering angle and moving toward the inside.
From around the clipping point, unwind the steering while increasing throttle opening and allow the car to move toward the outside on exit.
With this approach, the driver can avoid adding unnecessary distance while allocating the tires’ available friction effectively among deceleration, cornering, and acceleration.
In other words, the outside–inside–outside line may not be an independent fundamental technique for driving quickly.
Rather, when a driver applies a rational sequence of braking, turning, and acceleration inputs, this line makes it easier to use the tires’ available friction efficiently and, as a result, shorten the time through the complete corner section including the straights before and after it.
That is how I, Rikutsu Konetaro, have recently come to think about it.
A Late Apex Prioritizes Acceleration on Corner Exit
Within the broad family of outside–inside–outside lines, one version places greater emphasis on exit acceleration.
This is the late apex line.
Figure 3. A Late-Apex Outside–Inside–Outside Line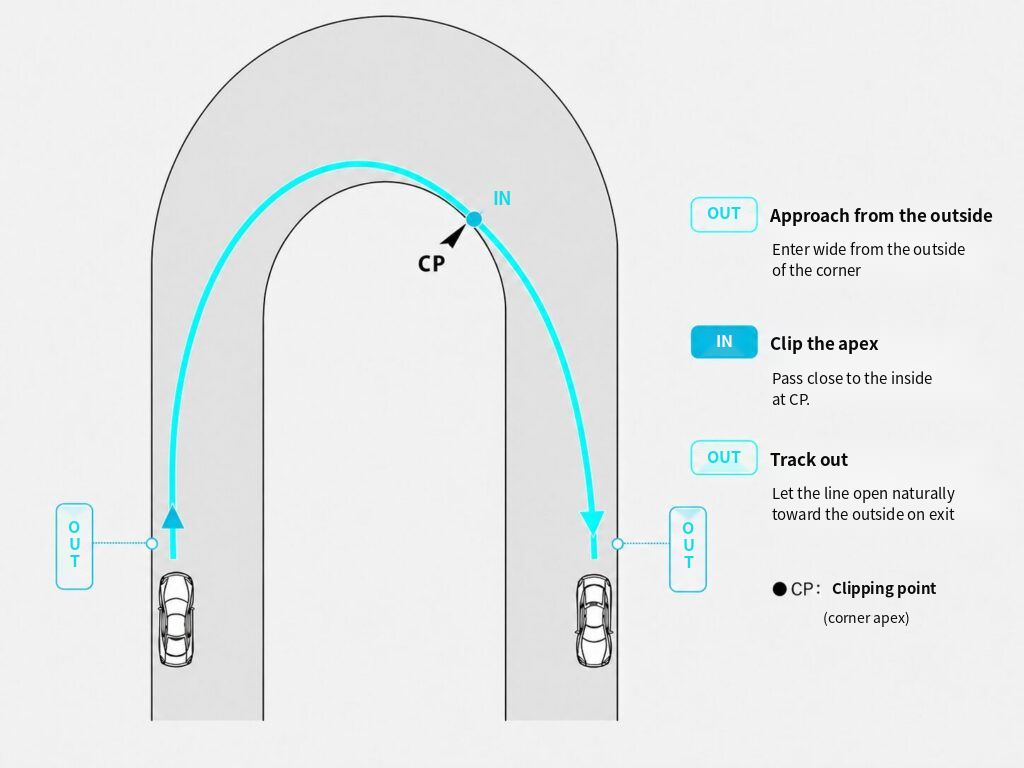
In the basic outside–inside–outside line shown in Figure 1, the clipping point is placed around the middle of the corner.
With a late apex, however, the car remains toward the outside for longer, and both the turn-in point and the clipping point are shifted toward the exit side of the corner.
On entry, the car must change direction over a relatively shorter distance.
That reduces the turning radius, and in some situations the driver must accept a slightly lower entry speed or minimum corner speed.
In return, the line after the clipping point can be made straighter.
The steering can therefore be unwound earlier.
Because the tires can transfer their available capability from cornering to acceleration sooner, the driver can apply throttle earlier and use a larger throttle opening.
The purpose of a late apex is not simply to increase the distance traveled with some amount of throttle applied.
What matters is how much throttle can be used, and how early that larger throttle opening becomes available.
It is often better to unwind the steering earlier and use a larger throttle opening than to spend a long distance carrying a large steering angle while using only a small amount of throttle.
This can increase corner-exit speed.
If a long straight follows, that speed advantage is carried down the entire straight.
However, moving the clipping point later does not automatically make the car faster.
If it is moved too far toward the exit, an excessively abrupt direction change may be required.
That may force the driver to reduce minimum speed significantly, or the car may simply fail to rotate sufficiently.
Likewise, if the next corner immediately turns in the opposite direction, using the full track width on exit may make positioning for the next corner more difficult.
The optimum clipping point changes depending on the length of the following straight, vehicle characteristics, road conditions, and the relationship with the next corner.
A late apex is not a fixed geometric shape.
It is a way of deciding how to distribute speed between the entry side and the exit side of the corner.
The Goal Is Not to Keep Trail Braking for as Long as Possible
Once drivers learn trail braking, it is easy to start treating the act of keeping some brake input all the way to the clipping point as the goal itself.
But that is not the real purpose.
The purpose is to complete the necessary deceleration while preparing the vehicle’s attitude for rotation, and to transfer the tire’s available friction smoothly from braking to cornering.
If excessive brake force is maintained for too long, the tires are asked to provide too much deceleration and cornering force at the same time.
On the other hand, if the brakes are released too early, a coasting phase may appear in which neither the brake nor the throttle is being used.
That interrupts the flow from deceleration into cornering.
What matters is not how long the brake pedal remains pressed.
What matters is smoothly connecting the point where the required deceleration is completed with the point where the required cornering force begins to build.
Because a racetrack provides a controlled environment, drivers often become focused on practicing later and later braking points.
But there is no need to search for the limit from the beginning.
Choose a conservative entry speed and a consistent braking reference point that can be confirmed every lap.
Practice reproducing the transition from straight-line braking to trail braking, the increase in steering angle, and the transfer from the brake pedal to the throttle.
Once that sequence can be reproduced consistently, the braking point and entry speed can be adjusted little by little.
Speed is not determined by delaying the start of maximum braking once.
It is determined by being able to reproduce, lap after lap, a smooth sequence from deceleration to rotation, and from rotation to acceleration.
→ About Rikutsu-Kone-Taro
